Implement SSH Login: Windows to Ubuntu, CentOS, Linux Server using Public/Private Key
☰ In this chapter, you will learn
- What is SSH?
- How to Install SSH on Ubuntu/CentOS server?
- How to generate Public key and Private key on Windows computer?
- How to Upload/Save Public Key to Remote server?
Introduction: SSH
SSH stands for Secure Shell. It's used for secure communication between two devices over an unsecured network. It's a safer option than using passwords.
With SSH, you use key-based authentication. Your public key is kept on the server, and your local machine has the private key.
SSH establish a secure encrypted connection between two devices over an unsecured network, such as the internet. To work with this protocol, the server must have installed ssh.
How to setup a VPS Server for SSH based authentication.
Step 1: SSH Installation
To see if SSH is on your server, type ssh -v in the command line. If it's not there, you can add it to the server with this command.
Check ssh status
ssh -vusage: ssh [-46AaCfGgKkMNnqsTtVvXxYy] [-B bind_interface]
           [-b bind_address] [-c cipher_spec] [-D [bind_address:]port]
           [-E log_file] [-e escape_char] [-F configfile] [-I pkcs11]
           [-i identity_file] [-J [user@]host[:port]] [-L address]
           [-l login_name] [-m mac_spec] [-O ctl_cmd] [-o option] [-p port]
           [-Q query_option] [-R address] [-S ctl_path] [-W host:port]
           [-w local_tun[:remote_tun]] destination [command [argument ...]]
Install SSH on Ubuntu/Debian
sudo apt update
$sudo apt install openssh-server
$sudo systemctl start ssh
Install SSH on CentOS/RHEL
sudo yum update
$sudo yum install openssh-server
$sudo systemctl start sshd
Step 2: Generating Public and Private Key on your Computer
Attention
Creating a new key could replace the old one, so you might get locked out of another server and lose access. Check for an existing key first. If you find one, use it instead of making a new one.
How to check existing key on Windows?
C:\Users\User_name\
Create a new RSA key pair
To create both a public and private key, run this command in your Windows Command Prompt or PowerShell.
>cd C:\Users\User_name\.ssh>ssh-keygen -b 4096Warning
If you're already using your PC to connect to another server using Public/Private key-based authentication, you need to create a new file to save your Public/Private key. Otherwise, Just hit Enter to create a id_rsa and id_rsa.pub file.
See the following article on How to implement multiple ssh keys to login into server from Windows machine.
https://www.easycodelab.com/vps/how-to-implement-multiple-ssh-keys-windows-machine.php
It's a good idea to keep a backup of your key file in a safe place. If your system crashes, you'll still be able to access your server. To make a backup of your key file, go to the C:\Users\User_name\.ssh folder, copy all the files, and save them in a secure folder.
> ssh-keygen -b 4096Enter file in which to save the key (C:\Users\Prashant/.ssh/id_rsa): Press Enter
Enter passphrase (empty for no passphrase):Crate your passphrase here
Enter same passphrase again:
Your identification has been saved in id_rsa
Your public key has been saved in id_rsa.pub
The key fingerprint is:
SHA256:1bHg4YpXsRtF6qWd8Zx3Cv9UoMl2Kj5NfAe7VhTgJ prashant@Digisem-Sir
The key's randomart image is:
+---[RSA 4096]----+
|                 |
|             B  o|
|          o  + + |
|         . += E .|
|        S . .o.+=|
|         .  .=o*%|
|          +.++oo%|
|         o o=+=A0|
|          ..0oo+=|
+----[SHA256]-----+

c:\Users\Prashant\.ssh>
>C:\Users\User_name\.ssh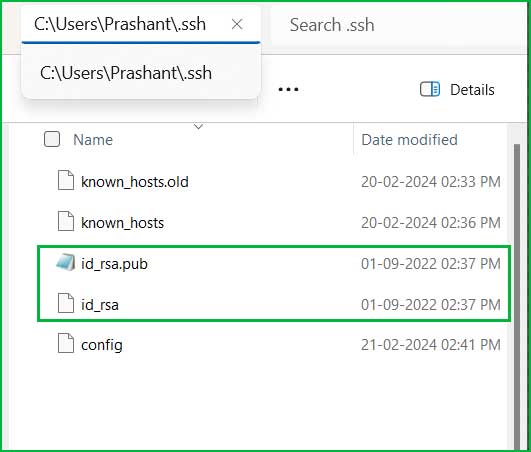
Step 3: Upload the Public key to your server.
After creating both the public and private keys, you should upload your public key to the server. Paste your public key into the authorized_keys text file on the server.
cd ~.sudo ls -a. If the .ssh folder exists, you're ready to proceed. If it doesn't exist, create .ssh folder using the mkdir .ssh command.~/.ssh/ folder using the following command.cd ~/.ssh/Example
cd ~
$ls -a.  ..  .bash_history  .bash_logout  .bashrc  .cache  .profile  .sudo_as_admin_successfulmkdir .ssh
$ls -a.  ..  .bash_history  .bash_logout  .bashrc  .cache  .profile  .ssh  .sudo_as_admin_successfulcd .ssh
sudo vi authorized_keysi to enter Insert mode, then paste the public key here.sudo vi authorized_keysssh-rsa AAAAB3NzaC1yc2EAAAADAQABAAACAQ CvxVDTu3CZdp2bmkAhhrx1LAl3CAd8JZjK0z5t Kt/j3R4Q9m+M9WbG61ySj1NhH7ehay0e2T5X5q IzCpLwdZ5K2zWtFsEN8YwrCjqvwx/Xr6zOU+gQ h1gNWCXjRfZbqMW3egyOG8zKf5FVMJ1/1qwpX+ kA5Q3z5pmjOGTidO+q2N5SNlLZehLRsLlNtHv4 hGN5KIf1sSf+4j+aC7j6J8Kn7yZ/ZGf/SD0uMr KUEJxGLe7Pslp74OFLtZ51clQSg6kQ== ~ ~ ~ ~ ~ "authorized_keys" 1L, 746B 1,745 All
Esc → Type :wq → Press Enter.Debian/Ubuntu
sudo systemctl restart ssh.serviceor,
sudo service ssh restartRHEL/CentOS
sudo systemctl restart sshd.serviceStep 4: Login back to your Server using SSH
Okay, everything has been done correctly. Now, it's time to log in to your server using key-based login. Simply follow the process.
ssh username@hostExample
C:\Users\Prashant> ssh [email protected]Enter passphrase for key 'c:\Users\Prashant/.ssh/easycodelab_key': Enter your passphrase here
Welcome to Ubuntu 23.04 (GNU/Linux 6.2.0-39-generic x86_64)

 * Documentation:  https://help.ubuntu.com
 * Management:     https://landscape.canonical.com
 * Support:        https://ubuntu.com/pro

  System information as of Wed Feb 21 10:21:31 UTC 2024

  System load:           0.0
  Usage of /:            10.0% of 19.21GB
  Memory usage:          10%
  Swap usage:            0%
  Processes:             93
  Users logged in:       1
  IPv4 address for ens3: 62.74.109.35
  IPv6 address for ens3: 2842:10a0:8554:1f8::3g7

Last login: Wed Feb 21 09:11:27 2024 from 190.52.45.109

ubuntu@easycodelab:~$
If you follow the above steps correctly, you will successfully configure SSH access to your server. Using public/private key-based login is considered much more secure than password-based login.
Once you've logged in successfully, ensure to disable password-based login. Follow the instructions in the next chapter to disallow password-based login.
Summary
When it comes to securing your VPS server, it's crucial to configure key-based access and disable password-based login. In this chapter, you'll learn how to create SSH keys, upload them to the server, and make the necessary changes on your computer to allow SSH access to your server.